
Normal Hours of Operation Information About Plainsman Products ClaysLow Temperature ClaysMedium Temperature Clays High Temperature Clays Porcelains Other Clays Native Clays Casting Slips MaterialsDry MaterialsStains Encapsulated Stains Liquids GlazesSpectrum Opaque Gloss Low Fire GlazesSpectrum Majolica Colors Spectrum Raku Glazes Spectrum Crystals Spectrum Ash Glazes Plainsman Dry Glazes Potter's Choice Cone 5/6 Glazes Celadon Cone 5/6 Glazes Amaco Satin Matte Glazes Spectrum Hi Fire Cone 6 Glazes Spectrum Shino Glazes Cone 6 Liquid Brights UnderglazesCrysanthos UnderglazesSpectrum RAC Underglaze Pens Amaco Velvet Underglazes EnamellingEquipmentKilnsElectric Pottery KilnsElectric Glass Kilns Kiln Furniture Cones Elements Kiln Parts, Accessories Exhaust Systems Refractories Potter's Wheels Slab Rollers Hand Extruders Scales Banding Wheels Air Brushes ToolsBrushesThrowing Tools Trimming, Turning, Cutting Tools Wood/Bamboo Tools Rollers/Stamps Decorating Tools Glazing Tools Ribs & Scrapers Ribbon/Wire Tools Rasps Knives, Needle Tools, Cutters Tool Kits Unclassified AccessoriesMiscellaneous AccesoriesCorks/Stoppers Cork Pads Oil Lamp Accessories Dispenser Pumps Teapot Handles Bisque Tiles Books | Covid-19 Status: Click here to find out more
Visit Our Full Catalog & Store In Store Shopping availablePlainsman Pottery Supply is open for in-store shopping. Pickup orders may still be placed via email at larry@plainsmanclays.com, or over the phone by calling 780-440-4791. Click the links to the left to get information and pricing on our products. Click the "Plainsman Data Sheets" for details information on the use and Plainsman clay bodies and glazes. The blog below is intended to help you with all manner of technical issues in ceramic hobby production, these posts come every few days, so check back often. Technical Tips BlogCone 6 iron red with a catcher glaze
This is G3948A (similar to the popular Amaco Ancient Copper product). To get this stunning result, it needs to be applied thickly. Therefore, it runs a lot. But the catcher glaze around the bottom of these mugs has stopped the flow. The catcher is a glossy black, G3914A (but Amaco Obsidian would also likely work). I have learned to put it on with the right height (about 2cm) and right thickness, and then apply wax emulsion to prevent the iron red glaze from sticking during dipping. The inside glaze, G2926B, is one I have tested and developed to fit Plainsman clay bodies as a liner. Context: You can make your.., Souvenir mugs that demonstrate.., Catch Glaze Thursday 15th January 2026 Converting a glossy transparent glaze to a calcium matteA ten-minute video to give glaze nerds goose bumps!
Watch the G1214Z video to see me convert the G1214M cone 6 clear base into G1214Z cone 6 calcium matte using simple glaze chemistry and recipe logic. This first appeared in the Digitalfire desktop Insight instruction manual 30 years ago. It is an understatement to say that this process is interesting if you want to know more about glazes, their chemistry and recipe logic. Watch this video and see me adjust the recipe of my high-calcium transparent cone 6 glaze to convert it into a calcium matte. In an Insight-live.com account, the process is easy enough for anyone. We'll cut the Si:Al ratio, increase the CaO, maintain the thermal expansion for glaze fit and make the recipe shrinkage-adjustable using a mix of calcined kaolin and raw kaolin. We will even compare it with the High Calcium Semimatte from Mastering Glazes. Context: Two cone 6 matte.., Partially and fully opacified.., A hazard of using.., Converting G1214M Cone 6.. Wednesday 7th January 2026 This GA6-B glaze is better than beer bottle glass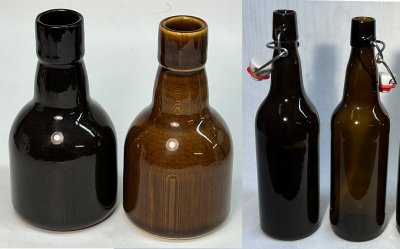
Ceramic glazes, like this GA6-B, are actually just glass. But they are not like bottle glass. The latter is formulated to work well in forming machines (harden quickly), melt and stiffen quickly, have low melt viscosity and resist milkiness and crystallization on solidification. The chemistries to accomplish this have adequate resistance to leaching and adequate durability for a few uses. A stoneware glaze melt needs to be much more viscous (to stay put on vertical surfaces). And, it must have a lower thermal expansion (to match common clay bodies). And, it must resist crystallization much more (since it cools slowly). Fortunately, meeting these needs brings along big benefits: Greater durability, hardness and resistance to leaching. Stoneware glazes and bottle glass share a common trait: They have about the same amount of SiO2. But the similarity ends there, stoneware glazes have: Context: 3D-printing artifacts on a.., Meet two glazes at.., Regular bottles of beer.., v7 Classic beer bottle.., Food Safe, Beer Bottle Master Mold.. Wednesday 7th January 2026 Glaze dunking videos reveal the value of thixotropy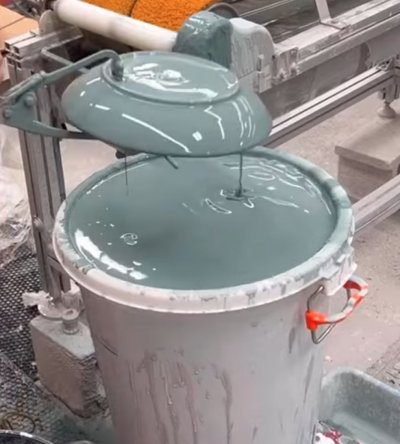
These videos from Eastfork Pottery demonstrate their use of thixotropic glaze slurries. Watch them to see how effective a highly gelled glaze is. It enables a quick dip, stays fluid while draining, gives even coverage and dries in seconds. These don't hard-pan or settle out in the bucket either. They work on porous or dense bisque. Almost any glaze can be thixotropic if you take the time to learn how to do it. The fast drying enables the use of twin running (or twin belt) foot wiper machines (best shown on these Instagram and Facebook videos). Context: Instagram Eastfork Pottery thixotropic.., Tiktok Eastfork Pottery thixotropic.., Facebook Eastfork Pottery thixotropic.., Eastfork Pottery, Thixotropy Thursday 11th December 2025 Glaze cracking during drying? Wash it off and then do this.
If your pottery glaze is doing on drying then it will crawl during firing. Wash it off, dry the ware. Then check the water content. If the glaze has worked fine in the past then it is likely going on too thick because the specific gravity is too high - just repeat cycles of adding a little water and dip testing (make it thixotropic if needed). But that was not the issue here. Glazes need clay to suspend and harden them, but too much clay means trouble. This was Ravenscrag Slip, a clay, being used pure as a cone 10R glaze. The glaze appeared to go in perfectly and it dried to the touch in ~20 seconds. But shrinkage continues after that, revealing after a couple of minutes. Fixing the issue was a matter of adding some roasted Ravencrag Slip to the bucket. That reduced the shrinkage and therefore the cracking. Any glaze containing excessive kaolin can be fixed the same way (trade some of the raw kaolin for calcined kaolin). Some glazes that contain plenty of clay also have bentonite - a simple fix for these is to simply remove the bentonite. Context: Calcined Kaolin, Calcination, Crawling Friday 5th December 2025 Custer Feldspar vs Nepheline Syenite at cone 8 oxidation
Although Nepheline Syenite and Custer Feldspar are used as effective body maturing agents and fluxes in glazes past cone 6, curiously, neither of them melt well by themselves. Thus, both of these come 6 melt fluidity tests add 20% Ferro Frit 3134 to get them flowing. This is a 2021 shipment of the feldspar and a 2022 shipment of the nepheline. Context: Custer Feldspar, Nepheline Syenite, Casting pure nepheline syenite.., Pure nepheline syenite mug.. Thursday 27th November 2025 Low fire ware cracking during firing. Why?
Most low-fire bodies contain talc. It is added for the express purpose of increasing thermal expansion. The natural quartz particles present do the same. These are good for glaze fit but bad for ware like this. There are also sudden volume changes associated with cristobalite, but it forms (from quartz) at stoneware temperatures so should not be a concern in terra cotta or a white low fire body. You could fiddle with the clay recipe or change bodies, but better to change the firing schedule. The quartz in stonewares goes through a sudden volume change between 950-1150F on the way down. Quartz particles in low fire bodies will do the same. A simple fix is to slow down the entire cooling cycle like this potter did. Or, learn to program your kiln to approach this range more slowly, then ease down through it. No electronic controller? Learn a switch-setting-schedule to approximate this down-ramp (buy a pyrometer if needed). Context: Manually programming a Bartlett.., Dunting, Quartz Inversion, Cristobalite Inversion, Cristobalite Sunday 23rd November 2025 Non-plastic, very stiff clay is required hereNo potter could use it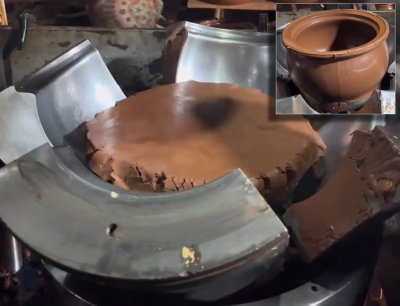
Potters love plastic clay. On the wheel it enables pulling larger, more overhang, thinner walled pieces. For beginners it can make the difference between success or a collapsed lump of mud. The downside is high drying shrinkage and danger of cracking. But potters know how to exercise care in drying to get success anyway. Context: Video on Instragram shows.. Saturday 22nd November 2025 The ultimate example of delayed crazing: 90 years!Glaze chemistry is the key to understanding it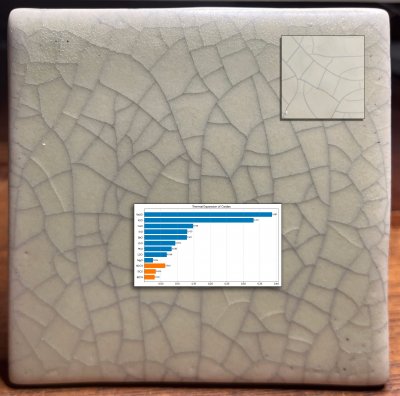
A restoration project faced a tile-matching challenge. At installation in a bathroom 90 years ago, the tiles were not crazed. But between then and now it happened (shown inset upper right). Now, a restoration specialist is tasked with duplicating the aged effect (one unsuccessful attempt is shown here). The shade, opacity, degree of matteness, bubble-free matrix and surface character of the original are all real challenges. Duplicating the crazing is even more difficult. Why? Matching "time-crazing" with a crackle glaze pattern will be temporary (it will craze much more after installation). Context: Turning delayed crazing into.., Glaze Crazing Monday 10th November 2025 Potter goes full DIY and makes her own porcelainThe best thing happens: Failure on the third mix!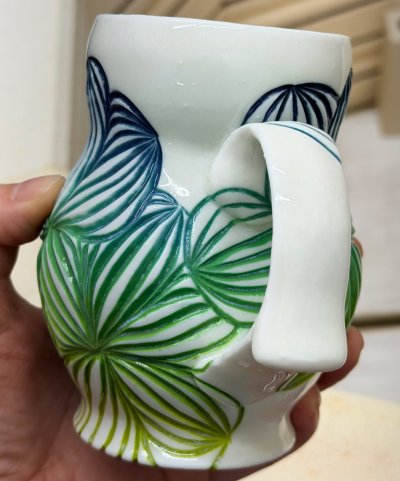
Super white translucent porcelains are expensive, approaching $200/box in some countries! Even so, variation in properties is common (certainly not good for a "tipping point body" that is difficult to make). The idea of making your own clay body is actually feasible here. Yet Kirsty Kash, maker of this mug, told me that this amount of DIY was something she had never really considered, thinking it would be too complicated without guidance. But ongoing issues with the commercial clay gave her the motivation to give it a try (using a recipe similar to L3778D). She weighed out the materials, slurried up the mix using a propeller mixer, finished by blender mixing and then dewatered on a super-clean plaster bat. Context: Formulating a Porcelain, Agglomeration of New Zealand.., Kirsty Kash Ceramics, Digitalfire Insight-Live Saturday 8th November 2025 Why would a glaze turn into a jelly like this?
This is one of the things Gerstley Borate commonly does (when its percentage is high enough). It is also highly thixotropic - this can be stirred vigorously to thin it, yet within seconds it turns back to jelly again. This is part of the reason it is often referred to as “ghastly borate”. Side effects of this include high water content, slow drying, excessive shrinkage on drying, cracking and crawling. To attempt a fix, I deflocculated it with Darvan. It was stable enough to dip bisque ware, with difficulty (but pieces dried very slowly). But overnight it has turned back into a gel. What can be done with a mess like this? Start over, with three options: Context: Gerstley Borate, Glaze Gelling, Getting Frustrated With a.. Wednesday 5th November 2025 Rutile Blues - Almost every single stoneware potter uses themThese are made from Canadian materials and recipes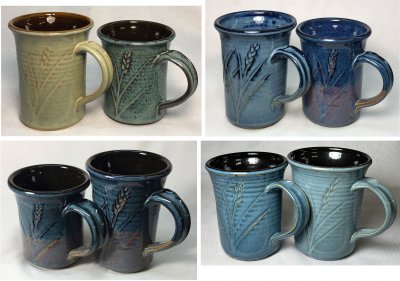
There is a lot of magic, Canadian magic, in this picture. Pretty well every single potter working at mid-temperature needs rutile blue, gloss black, honey amber and transparent glazes (even multiple versions of each). And almost all need a base slip (or engobe). Here they are. Context: I drink from these.. Sunday 2nd November 2025 Thickly applied slips must fit the body and each other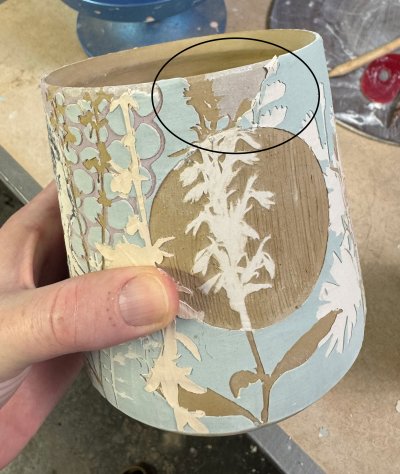
Fit? It has to stick well. And stay stuck during drying (and shrinking). And the bond has to survive shrinkage that happens during firing. This potter is doing thick applications of each slip (actually that makes them engobes). She uses stains, that's wise, metal oxides bring baggage when used to color slips (e.g. their decomposition can affect the bond, they can gel the slurry, flux the fired product thereby increasing the firing shrinkage of the slip). Stains are better because they affect slurry and fired properties less. But there are still enough issues that each colored slip deserves testing. This potter first slaked B-mix as a slip (it is highly plastic), using it at a runny yogurt consistency. But it bubbled when fired hotter than a cool cone 6. A switch to porcelain slip (which is non-plastic) is shown here. It flaked off as it dried (even in a damp box for 24 hours), also after bisquing to cone 08, and sometimes even after firing to cone 6. This signalled a drying mismatch between body and slip, the bond that managed to survive drying was weakened enough to fail on firing. Context: L3954B, This pottery glaze is.. Monday 15th September 2025 An 85-year-old Medalta Thrown Beer Bottle:How can it be so white, speck-free and uncrazed?
These (right) were made individually in the factory during the 1930s and 1940s (the insides have pronounced throwing rings and slip drips). The potters were able to make up to 500 per day, even though they took the time to smooth the outside using a rib! The inside base of this one is bowl-shaped (the walls near the base are very thick), this helps explain how they were able to throw them so quickly. Context: New incentive to develop.. Saturday 12th July 2025 v6 Beer Bottle DrawingFits standard swing top stoppers.Available on the Downloads page 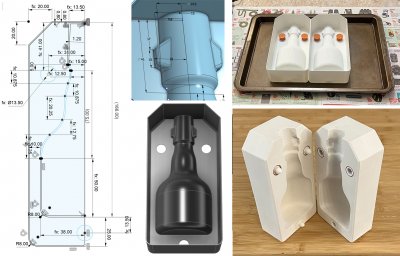
3D print this, pour in plaster to make a slip casting mold! My previous work on this project assumed a smaller 3D printer (making it necessary to print flanged PLA mold sections that clip together). But larger 3D printers are now common, making the CAD work much easier. This OnShape drawing is parametric for height, body diameter, wall and plaster thickness, and neck height (for the full bottle set body=160mm, neck=96). This uses my standard natch system. Neck vertices are proportional to height, so resizing works well. The top end is filleted to permit the longest possible mold on the print bed (diagonally). The bottom inside perimeter is chamfered, strengthening the default 0.8mm side wall junction to the base (that being said, be careful not to flex it too much when removing it from the print bed). Context: Swing Top Stopper Mechanism.., A 3D Printed Mold.., DIY natches spacers and.., Here s my setup.., v7 Classic beer bottle.., Beer Bottle Master Mold.. Monday 30th June 2025 |
Plainsman Pottery Supply, 9517 - 41 Ave NW, EDMONTON, AB T6E 5X7
Phone: 780-440-4791, FAX: 780-490-7591, Email: larry@plainsmanclays.com